به نام خداوند مهربان

استفاده ستاره در پارامتر های ارسالی:


def foo(a, b, c):
    return(a, b, c)

t = (1, 4, 6)
print('Output tuple unpacking: ',foo(*t))

d = {'a': 10, 'b': 20, 'c': 30}
print('Output dictionary unpacking: ',foo(*d))
print('Output dictionary unpacking: ',foo(**d))


خروجی:

    
Output tuple unpacking:  (1, 4, 6)
Output dictionary unpacking:  ('a', 'b', 'c')
Output dictionary unpacking:  (10, 20, 30)

استفاده در آرگمان:

def test_var_args(farg, *args):
    print ("formal arg:", farg)
    for arg in args:
        print ("another arg:", arg)

test_var_args(1, "two", 3)


def test_var_kwargs(farg, **kwargs):
    print ("formal arg:", farg)
    for key in kwargs:
        print ("another keyword arg: %s: %s" % (key, kwargs[key]))

test_var_kwargs(farg=1, myarg2="two", myarg3=3)

خروجی:


formal arg: 1
another arg: two
another arg: 3
formal arg: 1
another keyword arg: myarg2: two
another keyword arg: myarg3: 3


  • حسن دلدار

create a virtual environment using the Python venv module:

python -m venv .env

You can jump in and out of your virtual environment with the activate and deactivate scripts:

# Activate the virtual environment
source .env/bin/activate

# Deactivate the virtual environment
source .env/bin/deactivate

In windows:

.env\Scripts\activate


You can make sure that the environment is activated by running the which python command: if it points to the virtual environment, then you have successfully activated it!

which python
/home/<user>/transformers-course/.env/bin/python


  • حسن دلدار

دور زدن تحریم های ظالمانه علیه مردم ایران عزیز با کمک  مرورگر Tor :

ابتدا مرورگر همراه با هسته Tor رو از لینک زیر دانلود کنید (Tor Browser) (برای دانلود بهتر است از وب پروکسی های رایگان که با جستجو در اینترنت میتوان یافت استفاده و دانلود کنید):

https://www.torproject.org/download

بعد از اتمام نصب و فشردن دکمه اتصال از اتصال به شبکه Tor مروگر مطمئن شود(باید بتوانید بدون محدودیت از شبکه اینترنت استفاده کنید).

مروگر Tor ، یک پورت معمولا آزاد رو با شماره 9150 به کار میگیره (Expose) که میشه از اون به عنوان پروکسی از نوع Socks نسخه 5 استفاده کرد .

  • حسن دلدار

Connect to adb by wifi steps:

1 - stay connect via USB

2 - connect to your WIFI network (computer and mobile device both)

3 - ping DeviceIP (must be have ping to your device)

4 - adb kill-server

5 - adb usb

6 - adb tcpip 5555

7 - adb connect yourDeviceIP

8 - adb devices (must be see two device names , one of them is by deviceIP)

9 - unplug USB cable 

  • حسن دلدار

The project files uvprojx and uvoptx have UNIX-style line endings (LF). In Windows systems, usually
CRLF is used. Git automatically detects this and changes the line endings to CRLF on the server. But then the
status of these two project files is always “changed”. You can get around this problem using the command


git config --global core.autocrlf false

  • حسن دلدار

برای اتصال صحیح افزونه ویژوال استودیو کد  Thunder-client  به پروژه موجود  باید در تنظیمات این افزود Thunder-client: Save To Workspace تک زده شود.

برای اتصال صحیح به سرور با زبان php  در این افزونه بجای استفاده از localhost یا 127.0.0.1  باید از [1::] استفاده شود. 

  • حسن دلدار

ساخت پایگاه داده خالی sqlite


>sqlite3 mysqlite.sqlite

>.databases

>.quit

  • حسن دلدار

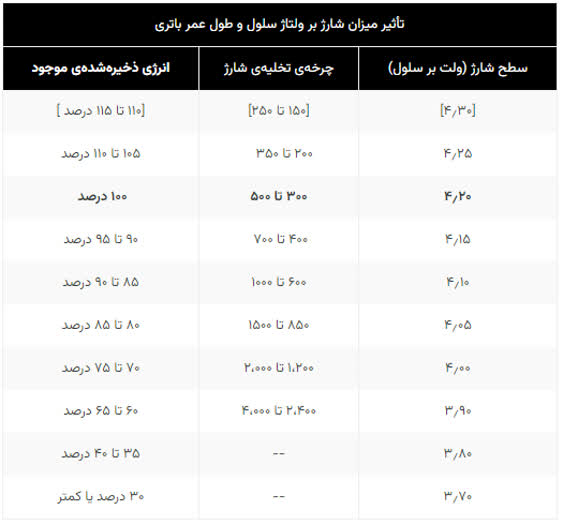
بهتر است باتری لپ‌تاپ را تا ۸۰ درصد شارژ کنیم و بگذاریم تا ۴۰ درصد تخلیه‌ شود

باتری‌های لیتیومی اگر بین ۴۰ تا ۸۰ درصد شارژ شوند، عمر طولانی‌تری خواهند داشت. 

  • حسن دلدار

In this approach, we will use the ADB (Android Debug Bridge)tool available in Platform-Tools inside the Android SDK.

If you’re working on Windows, check that the environment variables path is set to the Platform-Tools (xxx/Users/Library/Android/sdk/platform-tools/)As you’ve configured the paths, just execute your commands type adb in the terminal or at the command prompt, which gives you the list of options.

Remember, we need to be connected over the same Wi-Fi network in the system and mobile. Let’s get started.


Step 1. Connect the device to the system via USB for initial setup

To check whether it’s properly connected, open the built-in terminal and run the command adb devices. This gives you the list of devices currently connected.


step1

Step 2. Set the target device to listen for a TCP/IP connection on port 5555

adb tcpip 5555


step2

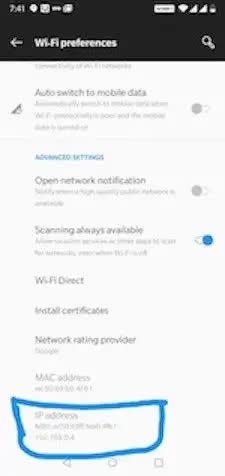
Step 3. Find the IP address of the Android device

For example, on a Nexus device, you can find the IP address at Settings > About the tablet (or About phone) > Status > IP address.

Step 4. Connect to the device by its IP address

adb connect IP_Address

Step 5. Remove the USB cable and test your connection by typing the initial command

adb devices


That’s it, we’re done. We can run and debug wirelessly now.

If the adb connection is ever lost:

  1. Make sure that your host is still connected to the same Wi-Fi network your Android device is.

  2. Reconnect by executing the adb connect step again.

  3. If that doesn’t work, reset your adb host:

adb kill-server


  • حسن دلدار

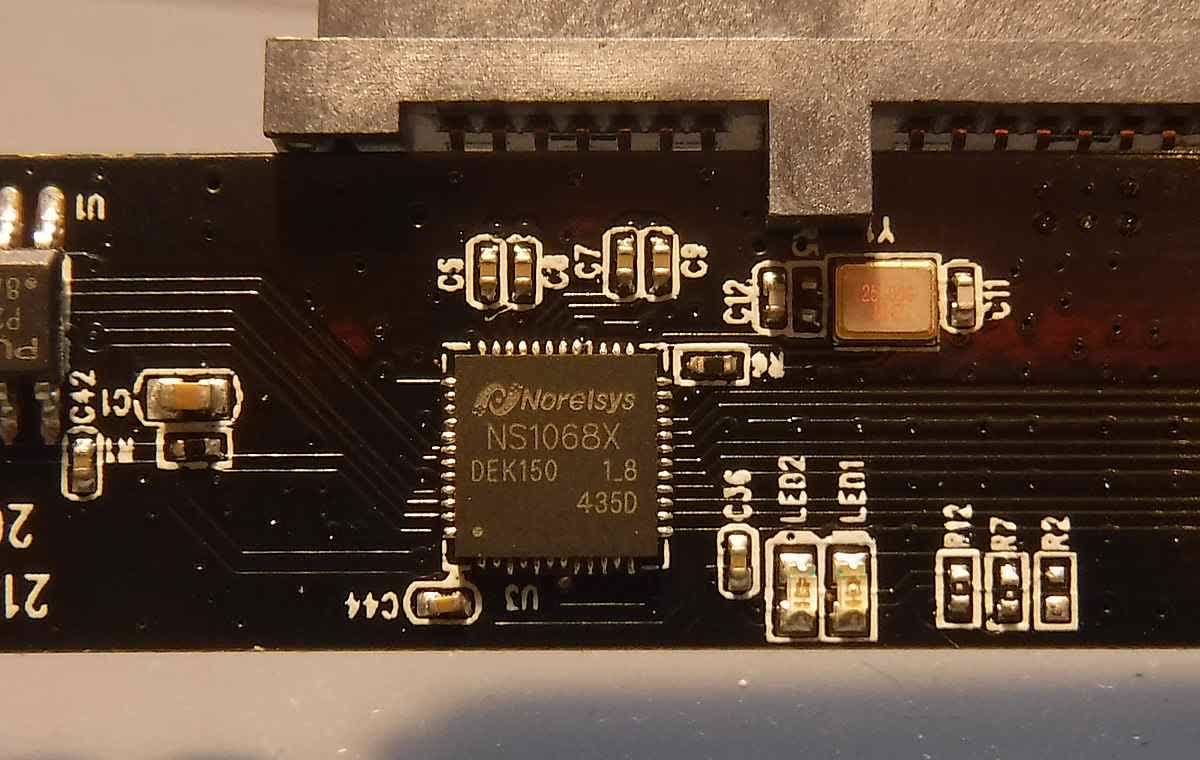
NS1068/NS1068X USB 3.0 to SATA Bridge Controller:

  • حسن دلدار